Create Outlook Express add-ons / plugins in VB.NET, C#, C++.
Customize OE toolbar, menu, add new buttons & menu items.
|
Add-in Express™
Add-in Express .NET and Outlook Express add-insThe feature-rich technology of Add-in Express makes Outlook Express plugin development quick and easy. Add-in Express implements everything required by the supported technologies and you focus on the applied code only. Just follow 6 steps below and see that the development of Outlook Express plug-ins with Add-in Express can be something one can enjoy :-) The sample Outlook Express add-on below is written in VB.NET, but you can also write in C#, C++ and RemObjects Chrome. 1. Create a new Outlook Express add-in solutionRun the Outlook Express Add-in wizard located in the "Other Projects | Extensibility Projects" item of the "New Project" dialog box.
Then, choose the programming language for your add-on solution (it is Visual Basic in our OE plug-in project) and click Ok.
The wizard creates Outlook Express solutions by using the Add-in Express solution template that consists of two projects: the add-in project itself and its setup project used for deploying your completed OE add-in.
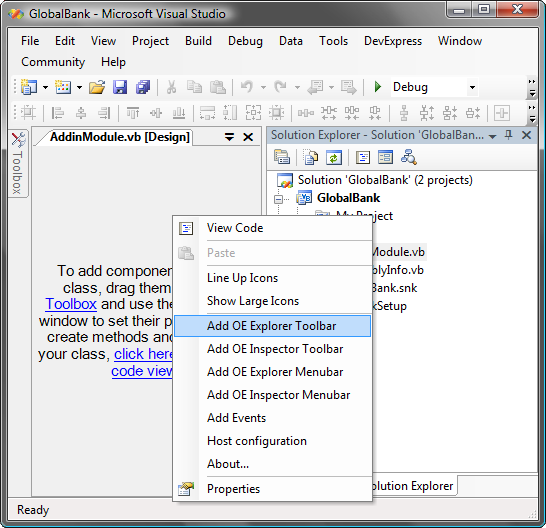
2. Add-in moduleAddinModule.vb (AddinModule.cs) is the heart of your Outlook Express add-on. You place components onto the Add-in Module designer in order to create the user interface of your OE add-in. You also write the code of your add-on to the Add-in module. So, right click the AddinModule.vb and select View Designer.
Then, you can add Outlook Express-related components to the add-in module designer. Right click on the add-in module designer and select Add OE Explorer Toolbar. It adds a new toolbar component to the add-in module.
Add-in Express allows you to add:
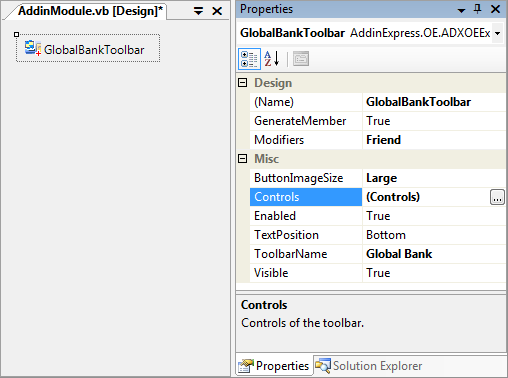
Find more about customizing Outlook Express menus. 3. Customize your Outlook Express toolbarSelect the toolbar component and customize it via the Properties window.
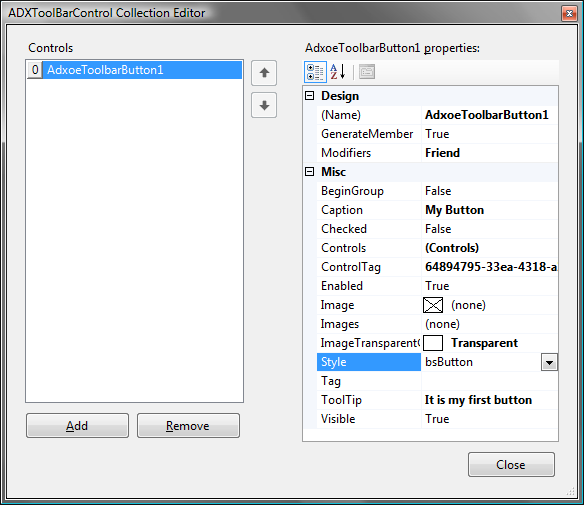
Then, using the appropriate properties you can specify the name and the code name of your OE toolbar, text position and image size for toolbar buttons. Note, you can use an ImageList and the Images property of your toolbar to store images and bind them to your buttons. More about customizing Outlook Express toolbar. 4. Add a new simple button to your Outlook Express toolbarTo add a custom button to your Outlook Express toolbar, you can use the editor of its Controls collection.
Then, use the appropriate properties to specify the caption and image for your button. With the Style property you can indicate the type of the button. Now you can add:
To add a separator between your buttons use the BeginGroup property. More about OE toolbar button styles. 5. Handle your button clickThen, add a new event handler for the Click event of your button. See two examples of such handlers below. 6. Build, register and run your Outlook Express add-inFinally, close all running instances of Outlook Express and save the project. Using the Build | Register Add-in command of the Visual Studio main menu, build and register the add-on and run Outlook Express.
|
|
See Also
|


