Customizing Word main menu, context menus and Backstage view: C# sample
Microsoft Word, like all the Office applications, introduced the Ribbon UI in Office 2007. However, Office 2003 still has a pretty big install base. This means that you will need to cater for the different user interface components that accompany Word 2003 and older.
In this article we’ll take a look at customizing the Word main menu, context menus and then jump to the latest version of Word 2010 and 2013 and see how to customize the Backstage view.
- Creating a COM Add-in for Word 2013 – 2003
- Customizing Microsoft Word main menu
- Creating a custom context-menu for Word 2007 – 2003
- Customizing the rbbon context-menu for Word 2013 – 2010
- Creating a custom Backstage view
Creating a COM Add-in for Word 2013 – 2003
We’ll start by creating a new COM Add-in project in Visual Studio with Add-in Express for Office and .net. Select your programming language (we choose C# for our Word add-in, but you can use VB.NET or C++.NET too), and Microsoft Office 2003 as the minimum supported Office version, in this way we’ll get our addin to work across all versions of Word 2003 – 2013.

Since, we’ll look at Microsoft Word customization in this article, only select Microsoft Word in the list of supported applications.

Customizing Microsoft Word main menu
Adding a custom top-level menu item
The Word main menu (aka menu bar) is the top-most menu visible in the Word application window. Using the Add-in Express ADXMainMenu component, you are able to add your custom menus to the Word menu bar or add your own menu items to the existing menus.
Begin by adding a new ADXMainMenu component to your AddinModule designer surface.

Select the newly added ADXMainMenu component and set its SupportedApp property to Word. You’ll notice that the CommandBarName property’s value automatically changes to Menu Bar.

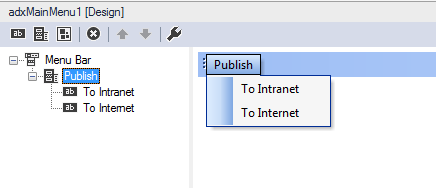
Next, add an ADXCommandBarPopup control to the main menu by selecting it from the built-in visual designer’s toolbar. Set its Caption Property to Publish and change the BeforeID property to 30003. 30003 is the internal ID of the Edit menu, and setting the BeforeID property to its value will cause our custom menu to be inserted before it on the Word main menu.
You can determine the control IDs of pre-Ribbon Office controls by downloading our free Built-in Control Scanner utility
Complete the menu design by adding two ADXCommandBarButton controls to the ADXCommandBarPopup. The final design of your custom menu should resemble the following:

Build, register and run your add-in project and you should now see your custom menu bar in Microsoft Word in-between the built-in File and Edit menus.

Adding custom menu item to a built-in Word menu
The above takes care of creating a top-level menu item in the Microsoft Word menu bar. To add you own items to, for example, the File menu in Word, add a new ADXCommandBarPopup control to the ADXMainMenu component and set its Id property to 30002, which is the File menu’s internal ID.
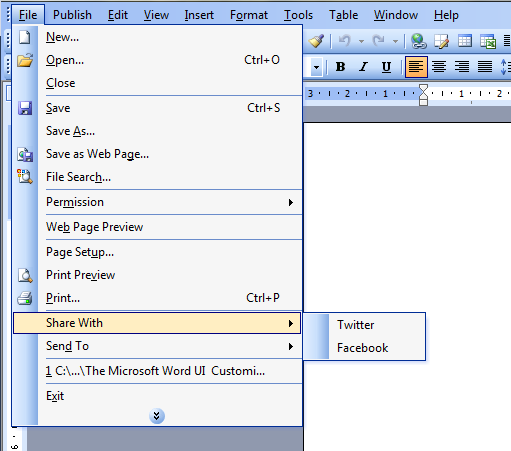
Next, add another ADXCommandBarPopup as a child control and set its Caption property to “Share With” and its BeforID property to 30095. This will insert your custom menu before the Send To menu item in the File menu.
In Visual Studio visual designer the final design for the menu will look like follows:

When running your Word addin project, you should see your “Share With” menu in the built-in File menu:

Creating a custom context-menu (Word 2003 – 2007)
Context-menus (aka right-click menus) are the menus that appear when you right-click inside Microsoft Word. If we want to add our own item to the context menu when a user selects an image in Word and right-click on it, we need to add an ADXContextMenu item to the AddinModule designer surface.
When you select the component in Visual Studio, you will be presented with a visual designer similar to the one we’ve used to design the Word main menu earlier. Change the SupportedApp property to Word in order for the CommandBarName property to contain all the available context-menus for MS Word, change it to Inline Pictures.

In the Visual Studio designer the final design should look as follows:

Build and run your project and right-click on an image in Word, you should see your context-menu items in the menu:

Customizing the Ribbon context-menu (Word 2010 – 2013)
The context menu we’ve created earlier will not be visible in Word 2010 or 2013. If you need to customize context-menus of Word 2013 or 2010, you’ll need to use the ADXRibbonContextMenu control.

Select the control and click on the ellipses (…) button next to the ContextMenuNames property.

You will be shown a dialog, from which you can choose all the Word right-click menus your custom menu items should be added to.

You can then design your custom context-menu items using a similar visual designer in Visual Studio:

Customizing the Word Backstage view
Since Office 2010 the traditional File menu has been replaced by the Backstage view. The Backstage view is used to manage your document and perform the expected tasks such as creating, saving and sending documents in Word 2010 and 2013.
It is also a great place to add various options for your Word add-ins. To customize it, start by adding an ADXBackstageView component to your AddinModule designer surface.

You’ll notice a similar visual designer as the rest of the components. The Backstage view layout can be a little confusing, but the best way to understand it, is to experiment with different layouts until you’re happy with the result.
Using the visual designer, add components by clicking on their respective icons in the toolbar, and the final design can look similar to the following:

When running the add-in in Word, you should see your own Backstage view item when clicking on the File menu:

Thank you for reading. Until next time, keep coding!
Available downloads:
This sample Word addin was developed using Add-in Express for Office and .net:
Word add-in development in Visual Studio for beginners:
- Part 1: Word add-in development – Application and base objects
- Part 2: Customizing Word UI – What is and isn’t customizable
- Part 4: Creating custom Word ribbons and toolbars
- Part 5: Building custom task panes for Word 2013 – 2003
- Part 6: Working with Word document content objects
- Part 7: Working with Word document designs, styles and printing
- Part 8: Working with multiple Microsoft Word documents
- Part 9: Using custom XML parts in Word add-ins
- Part 10: Working with Word document properties, bookmarks, content controls and quick parts
- Part 11: Populating Word documents with data from external sources
- Part 12: Working with Microsoft Word templates
