Build Excel Automation Add-in: C#, VB.NET, C++
|
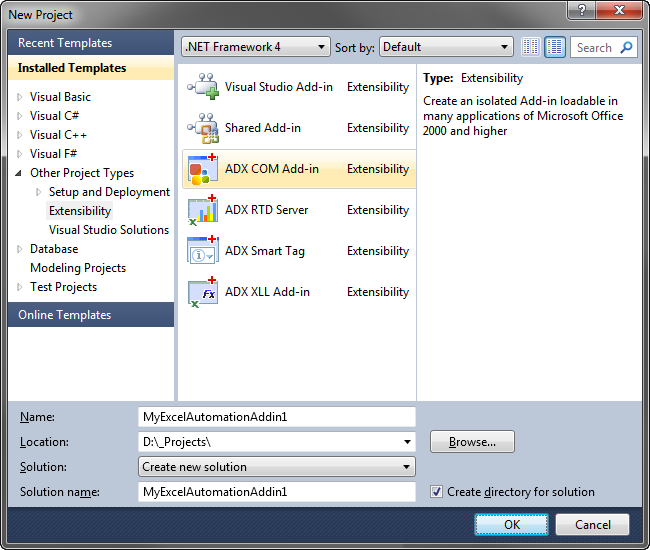
Add-in Express™ Add-in Express Home > Add-in Express for Office and .NET > Online Guide > Excel Automation Excel Automation add-insAdd-in Express allows creating Automation add-ins for Excel 365, 2021, 2019, 2016, 2013 and lower. The example below demonstrates how you create such an add-in providing a sample user-defined function. A bit of theoryExcel user-defined functions (UDFs) are used to build custom functions in Excel for the end user to use them in formulas. This definition underlines the main restriction of an UDF: it should return a result that can be used in a formula - not an object of any given type but a number, a string, or an error value (Booleans and dates are essentially numbers). When used in an array formula, the UDF should return a properly dimensioned array of values of the types above. Excel shows the value returned by the function in the cell where the user calls the function. There are two Excel UDF types: Excel Automation add-in and XLL add-in. They differ in several ways described in What Excel UDF type to choose? Per-user Excel UDFsAn Excel UDF is a per-user thing that requires registering in HKCU. In other words, a UDF cannot be registered for all users on the machine. Instead, it must be registered for every user separately. Step 1. Creating an Automation add-in projectYou start to develop your Excel Automation Addin with opening the New Project dialog in Visual Studio and navigating to the Extensibility folder.
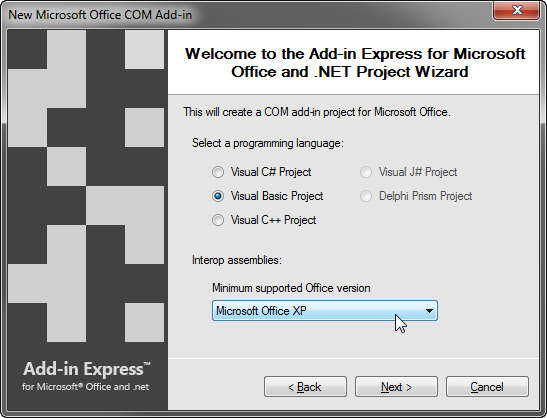
Choose Add-in Express COM Add-in and click OK. This starts the COM Add-in project wizard. The wizard allows choosing your programming language (C#, VB.NET or C++) and specifying the oldest Office version your add-in needs to support.
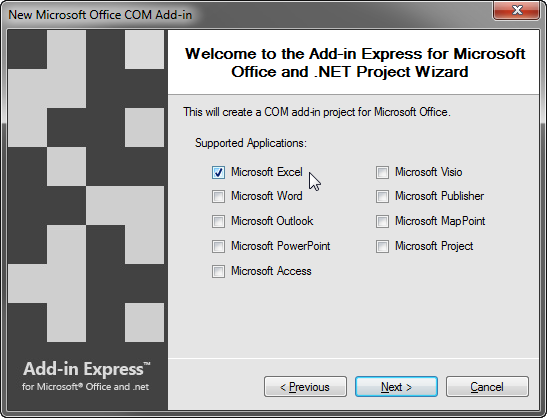
Choosing a particular Office version will add corresponding interop assemblies to the project. Later on, in case you need to support an older or a newer Office version, you will be able to replace interop assemblies and reference them in your project. If you are in doubt, choose Microsoft Office 2002 as the minimum supported Office version (because Automation add-ins are supported starting with Excel 2002). If you need background information, see Choosing interop assemblies. Choose your programming language and the minimum Office version that you want to support and click Next. The wizard allows creating add-in projects targeting several Office applications. Since we create an automation add-in, naturally, we select Excel.
For the settings shown on the screenshot above, the project wizard will do the following:
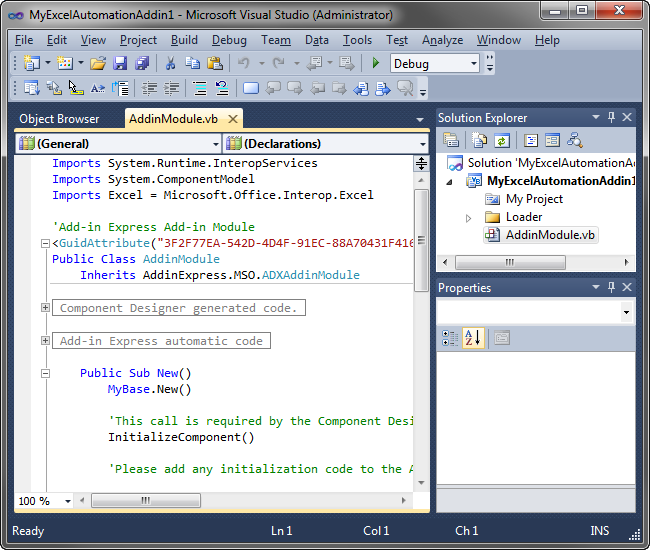
So, select Excel as the only Office application your automation add-in will support and click Next. On the next step, choose to generate new or specify an existing .snk file and click Next. The project wizard creates and opens a new Excel Automation Add-in solution in Visual Studio.
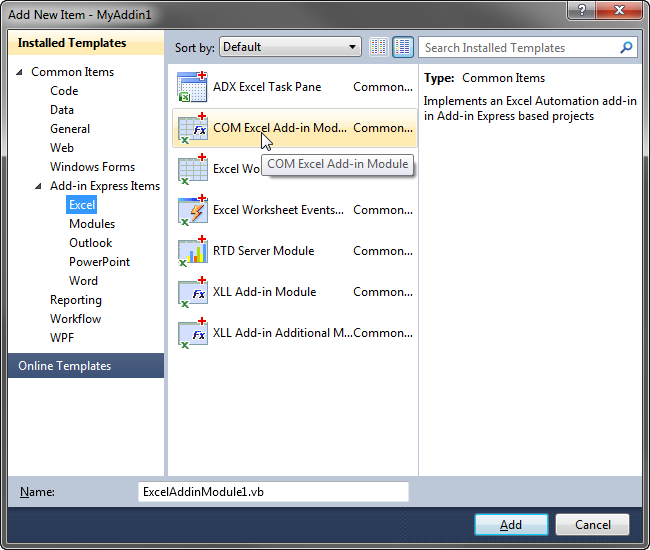
The solution contains only one project - the COM add-in project. Step 2. Adding a COM Excel Add-in moduleOpen the Add New Item dialog for the COM add-in project and navigate to Excel below Add-in Express Items. In order to add Excel user-defined functions to the COM add-in, you choose the COM Excel Add-in Module in the Add New Item dialog.
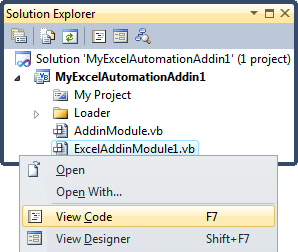
Choose COM Excel Add-in Module and click OK. This adds the ExcelAddinModule1.vb file, if you have chosen VB.NET as your programming language or ExcelAddinModule1.cs if C# is your language of choice to the COM add-in project. Step 3. Writing an Excel automation add-in functionIn Solution Explorer, right-click ExcelAddinModule.vb (or ExcelAddinModule.cs) and choose View Code in the context menu.
Add a new public function to the class and write the code below: Step 4. Running the Automation add-in in Excel
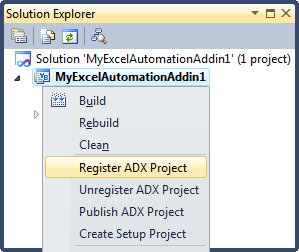
Choose Register Add-in Express Project in the Build menu, restart Excel, and check if your automation addin works. If you use an Express edition of Visual Studio, the Register Add-in Express Project item is located in the context menu of the COM add-in module's designer surface. You can find your Excel add-in in the Add-ins dialog:
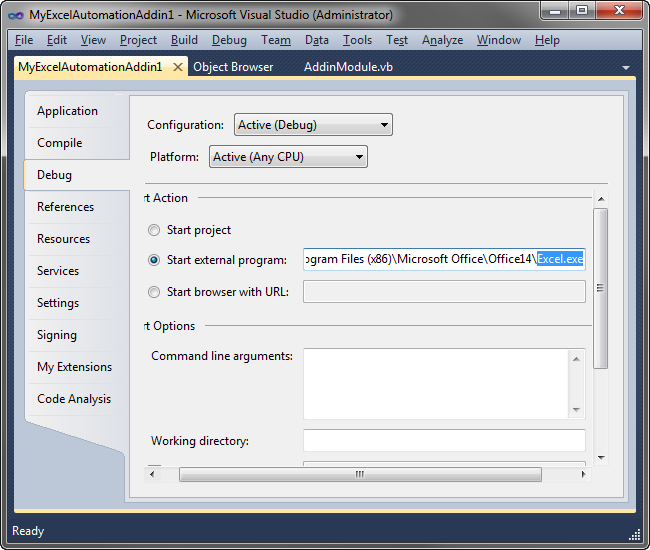
Step 5. Debugging the Excel Automation add-inTo debug your automation add-in, specify Excel as the Start Program in the Project Options window and run the project.
Step 6. Deploying the add-inThe table below provides links to step-by-step instructions for deploying Excel Automation add-ins. Find background information in Deploying Office extensions. Table 5. Deploying Excel Automation add-in: links to step-by-step instructions
What's next?You can download this Excel Automation addin project as well as many other examples on the following pages: Excel VB.NET samples and Excel C# samples. You may want to check the following sections under Add-in Express tips and notes:
If you develop a combination of Excel extensions, please check How to build an integrated Excel extension: COM Add-in, RTD Server and XLL in one C# project. |
