How to deploy Office add-in
per-user or per-machine
|
Add-in Express™ Add-in Express Home > Add-in Express for Office and .NET > Online Guide > Deploying Office add-ins > Office add-in deployment: things to consider Office add-in deployment: things to considerThis page features the following aspects of Office COM add-in deployment:
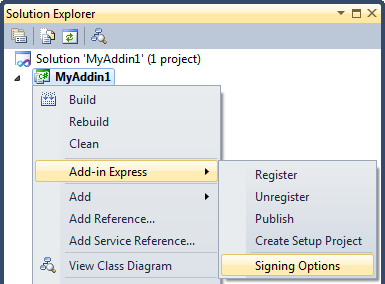
Signing an add-inAn administrator may require Office to load digitally signed add-ins only. To sign an add-in, you need to obtain a valid certificate; start with Introduction to Code Signing. After you get the certificate, you choose Signing Options in the Add-in Express context menu.
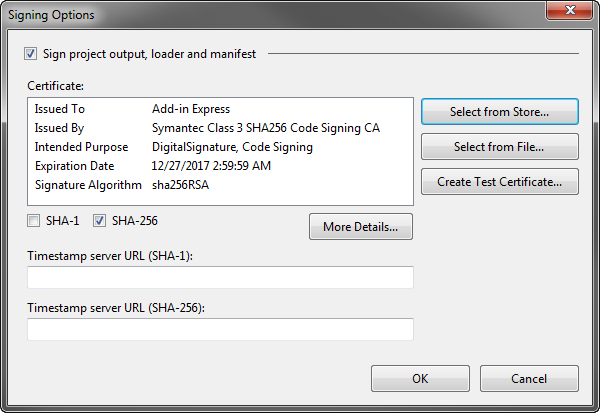
This opens the Signing Options dialog where you choose a certificate to use and optionally specify a timestamp server. You can also create a test certificate; normally, you use such a certificate for debugging purposes.
When building your add-in from the command prompt (e.g. on a build server), you can access the functionality that the Signing Options dialog provides using adxpatch.exe; find this utility in {Add-in Express installation folder}\Bin. To find the parameters that this utility accepts, start it with the /? parameter. Per-user or per-machine add-in?An Office add-in can be installed per-user or per-machine. By default, you Add-in Express project creates a per-user Office plug-in. Neither the Everyone option of an MSI installer nor the InstallAllUsers property of your setup project relates to installing Office extensions in the "for all users on the PC" way. Please see InstallAllUsers property of the setup project for details. To let your Office plugin work for all users on the machine you need to set the RegisterForAllUsers property of the corresponding Add-in Express module (to access it in the Properties window, click the designer surface of the module). Before you modify the RegisterForAllUsers property, you must unregister the add-in project on your development PC and make sure that adxloader.dll.manifest is writable.
Note that if the module doesn't expose the RegisterForAllUsers property, then the Office extension you create cannot be registered for all users on the PC; this is by design from Microsoft. The table below describes the availability of the "for all users" registration for Office extensions.
Per-machine extensions cannot be installed via ClickOnce, which is a deployment technology targeted to non-administrator-privileges installations. Starting from Vista SP1, a per-user Office extension will not be available for an administrator user running the corresponding Office application elevated, please see Per-User COM Registrations and Elevated Processes with UAC on Windows Vista SP1. Installing and registering an Office add-inWhen you run the installer on the target machine, the question arises: where to install the add-in? Note that per-user extensions are called so because a standard user is able to install them; that means that the user may install a per-user plugin to any folder accessible for the user. Note that ClickOnce installers always install to ClickOnce Application cache. A per-machine extension requires administrative permissions and, consequently, only administrators can install it; the target folder must be accessible by all users of the extension. Although, in the general case, you cannot prevent the user from choosing an incorrect folder, you can provide a valid default installation location. If you create a setup project using Add-in Express (see Creating MSI installers), the setup project wizard analyzes RegisterForAllUsers of the Add-in Express module used in your project and creates a setup project that is ready to install the files mentioned in Files to deploy to the following default locations:
Still, installing an Office extension isn't enough. To get loaded to the corresponding Office application, your Office extension must be described correctly in the Windows Registry; see Registry keys for exact registry locations. Add-in Express writes all required information to the correct registry locations so that you usually don't even think about this. You cannot deploy an Office extension using XCOPY because this does not create required registry entries. Permissions required for Office add-insAn Office add-in having RegisterForAllUsers set to False or not having that property at all, writes to HKCU when it is being registered and thus it can be registered by a standard user. Since writing to HKLM requires administrative permissions, only administrators can install (and register) a COM add-in or RTD server for all users on the PC; only these Office extension types have the RegisterForAllUsers properties in their modules. But before being registered, the Office add-in must be installed. Only the user having corresponding permissions can do this. Of course, this applies to any other software. Files to deployThe tables below contain minimal sets of files required for your Office extension to run. Office add-ins, XLL add-ins
For an XLL add-in, the loader names include the assembly name, say, adxloader.MyXLLAddin1.dll (adxloader64.MyXLLAddin1.dll). Excel Automation add-ins
RTD servers
Smart tags
|
Publishing from the Command Prompt
Add-in Express provides a command line tool that you use to automate the process of publishing your add-in projects. That tool is adxPublisher.exe located in the Bin folder of the Add-in Express installation folder. The utility is provided with the default configuration file; the file is called adxpublisher.exe.config; the file provides options and their descriptions.
To use the utility, you copy the .config file to an appropriate location (beside the project's adxloader.dll.manifest file – thank you, David!) and modify it there. The adxpublisher.exe.config file contains two sections, which we refer to as the ClickOnce section and the ClickTwice section. The sections contain settings for the corresponding deployment technologies.
You run the utility in this way:
- Adxpublisher.exe /OutputType=ClickOnce
- Adxpublisher.exe /OutputType=ClickTwice
If you don't specify the parameter, the utility will use the first section found.
To simplify the creation of such files, you can specify the corresponding settings in the Publish dialog; see Publishing With ClickTwice :) and Add-in Express ClickOnce Solution. Below is a sample adxpublisher.exe.config file:
<?xml version="1.0" encoding="utf-8"?>
<configuration>
	<configSections>
		<sectionGroup name="publish.Settings"
		        type="System.Configuration.ApplicationSettingsGroup, System, Version=2.0.0.0, Culture=neutral, PublicKeyToken=b77a5c561934e089">
			<section name="clickOnce.Settings"
			    type="System.Configuration.AppSettingsSection, System.Configuration, Version=2.0.0.0, Culture=neutral, PublicKeyToken=b03f5f7f11d50a3a"/>
			<section name="clickTwice.Settings"
			    type="System.Configuration.AppSettingsSection, System.Configuration, Version=2.0.0.0, Culture=neutral, PublicKeyToken=b03f5f7f11d50a3a"/>
		</sectionGroup>
	</configSections>
	<startup useLegacyV2RuntimeActivationPolicy="true">
    <supportedRuntime version="v4.0"/>
    <supportedRuntime version="v2.0.50727"/>
  </startup>
	<publish.Settings>
    <clickOnce.Settings>
       <clear />
    </clickOnce.Settings>
    <clickTwice.Settings>
       <add key="requiresElevation" value="false" />
       <add key="installerFile" value="..\..\..\..\MyAddin1Setup\1.0.0\Debug\MyAddin1Setup(1.0.0).msi" />
       <add key="publishingLocation" value="..\..\..\..\MSIPublish\" />
       <add key="installationUrl" value="http://www.MySite.com/Installers/" />
       <add key="certificateFile" value="..\..\..\..\..\..\test.pfx" />
       <add key="certificateSubjectName" value="" />
       <add key="certificatePassword" value="" />
       <add key="sha1Enabled" value="false" />
       <add key="sha256Enabled" value="true" />
       <add key="timestampUrl" value="" />
       <add key="timestampSHA256Url" value="" />
       <add key="edition" value="Public" />
       <add key="supportedEditions" value="Public" />
       <add key="downloaderFileName" value="myaddin1.exe" />
       <add key="customActionAssembly" value="" />
       <add key="customActionClass" value="" />
       <add key="iconFileName" value="" />
       <add key="targetApplicationNames" value="Excel" />
       <add key="quietModeDuringInstall" value="false" />
       <add key="quietModeDuringUninstall" value="true" />
       <add key="showDownloaderWindow" value="true" />
       <add key="showRunningApplicationsWarning" value="true" />
       <add key="signVersionInfo" value="false" />
       <add key="checkForUpdateReturnString" value="" />
       <add key="prerequisites" value=".NETFramework,Version=v4.0;Microsoft.Windows.Installer.4.5" />
       <add key="bootstrapperDirectory" value="C:\Program Files (x86)\Microsoft Visual Studio 14.0\SDK\Bootstrapper\" />
       <add key="createSetupExe" value="true" />
       <add key="generateMultiLanguagePrerequisites" value="false" />
       <add key="downloadFromVendorWebSite" value="true" />
       <add key="preBuildCommandLine" value="" />
       <add key="postBuildCommandLine" value="" />
       <add key="ftpAnonymous" value="false" />
       <add key="ftpUserName" value="" />
       <add key="ftpPassword" value="" />
       <add key="ftpPassiveMode" value="false" />
    </clickTwice.Settings>
  </publish.Settings>
</configuration>

